This page offers instructions on how to use the MyLynx student portal to register for courses via the web. Students with questions or concerns about using MyLynx to register for their courses are invited to contact their academic advisor and/or the Registrar’s Office for assistance.
Accessing the “Add/Drop” Functions
Students are able to find and select courses for their schedule using one of four different methods:
- Under the “Add/Drop” area of the “Course Catalog” portlet (Courses & Academics tab)
- Add by Course Code
- Add by Reference #
- Course Search
- From within the “My Degree Progress” portlet (Courses & Academics tab)
To access the “Add/Drop” area, select the “Courses and Academics” tab from the MyLynx header as shown below.

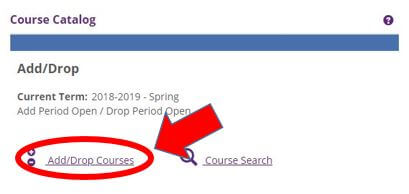
Once on the “Courses & Academics” tab, scroll down until you see the “Course Catalog” portlet and click “Add/Drop Courses”.
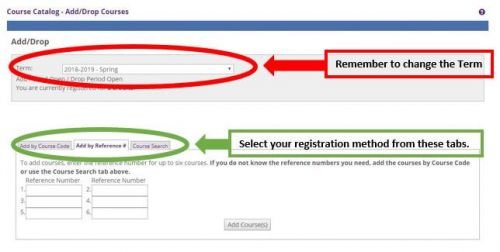
This will open the view just to the left. Before choosing a method of registration, remember to change the Current Term pull-down so that it equals the Term for which you want to add courses. Most students will want to select the full “Year – Term” such as those listed below:
- (Academic Year) – Fall
- (Academic Year) – Spring
- (Academic Year) – Summer
ABE and New Normal students in the accelerated programs may want to use the pull-down menu to select the specific session of the course:
- For 5-Week, ABE Students:
- (Academic Year) – Fall – ABE A1 Aug/Sept Session
- (Academic Year) – Fall – ABE A2 October Session
- (Academic Year) – Fall – ABE A3 November Session
- (Academic Year) – Spring – ABE A4 January Session
- (Academic Year) – Spring – ABE A5 February Session
- (Academic Year) – Spring – ABE A6 March Session
- (Academic Year) – Summer – ABE A7 May/June Session
- (Academic Year) – Summer – ABE A8 June/July Session
- (Academic Year) – Summer – ABE A9 July/August Session
- For 8-Week, New Normal Students
- (Academic Year) – Fall – NN Fall 1st 8 week Subterm
- (Academic Year) – Fall – NN Fall 2nd 8 week Subterm
- (Academic Year) – Spring – NN Spring 1st 8 week Subterm
- (Academic Year) – Spring – NN Spring 2nd 8 week Subterm
- (Academic Year) – Summer – NN Summer 1st 8 week Subterm
- (Academic Year) – Summer – NN Summer 2nd 8 week Subterm
Registration through “Add by Course Code”
If you already know which specific courses you want to add, “Add by Course Code” may be the easiest registration method for you.
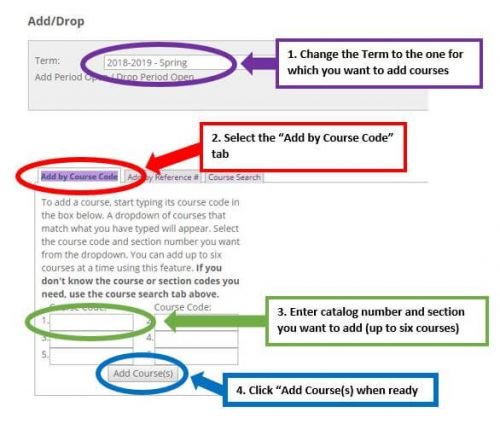
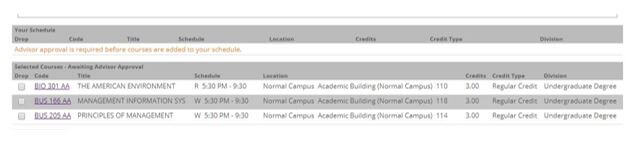
To add a course by the course code, just type the catalog number and section (for example, BUS 102 01) into one of the fields shown and click “Add Course(s)”. You can add up to six courses at one time through this method. Once added, your courses will appear below the “Add by Course Code” view as shown below.
Registration through “Add by Reference #”
Using the Course Schedule booklet, you can also add courses by using their reference number. The reference number for a course is located just below the catalog number and just to the left of each individual section on offer for that course.
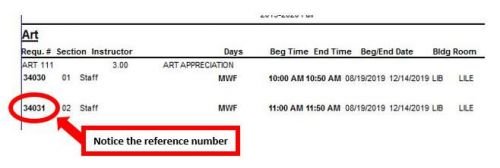
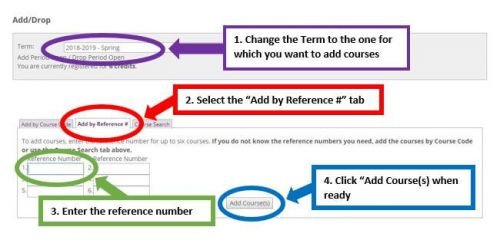
To add a course using the reference number, select the “Add by Reference #” tab of the “Add/Drop” view and enter the reference number into one of the fields shown below.
Added courses will appear below the view as shown in the image above under “Add by Course Code”.
Registration through “Course Search”
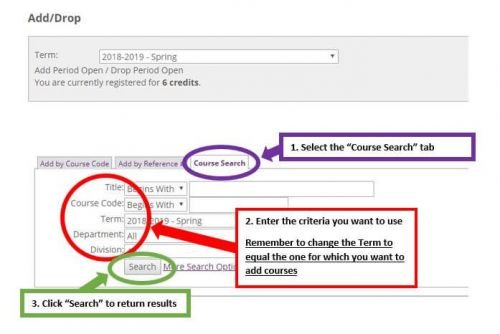
Using “Course Search” you can search through the full schedule for a given term, selecting those you want to add by clicking a check box next to the particular section you wish to add. To start searching for courses, select the “Course Search” tab in the “Add/Drop” view and enter the search criteria you want.
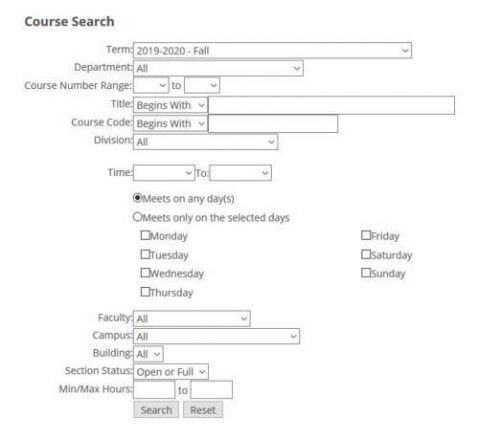
Selecting “More Search Options” expands the search criteria you can use as shown on the next page. Changing only the Term and clicking “Search” will return all of the courses available for that Term, allowing you to page through the schedule with courses listed alphanumerically by catalog number and section.
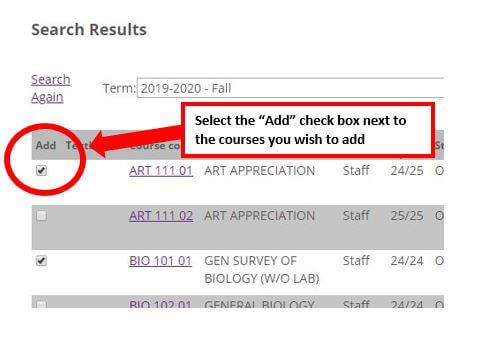
Once you find the desired course in your search results, select it by clicking the “Add” check box in the left-hand column as shown to the right:
To finalize the additions, select the “Add Courses” button on the lower left below your results (you may need to scroll to the bottom of the page). Adding the courses will refresh your screen, and the courses will appear below the view as shown in the image above under “Add by Course Code”.
Registration from with the “My Degree Progress” portlet
Through the “My Degree Progress” portlet, you can ‘drill down’ through your program requirements and find courses that directly apply to a particular requirement area. There are a number of stages involved as you move from requirement areas to different requirement subgroups and steadily down to the specific required courses. To start the process, select the “View All Details” button under the “My Degree Progress” portlet.
From the “View All Details” screen, select the requirement area you want to explore as shown to the right:

Selecting the requirement area will open up new details such as requirement subgroups or specific courses. Remember that you are seeing increasingly specific requirements with each step down into the area.
At the lowest level, the screen will display the specific courses that can be used toward that requirement as shown on below. Selecting “See available courses…” will open a course search screen, allowing you to search within the course schedule for courses meeting that requirement.
This course search works much like the “Course Search” registration method discussed above with the important difference that it is searching for an exact match to the course you specified on the previous screen. As with each registration method, you will need to change the Term pull-down to equal the one for which you wish to add courses.

Once your search results are returned, select the “Add” check box next to the course section you wish to add and then the “Add Course” button. Added courses will appear below the view as shown in the image above under “Add by Course Code”.
Registration Errors and “Courses Not Yet Registered” Messages
Occasionally, you may try to add a course and receive an “Unauthorized Course Entry” message. An “Unauthorized Course Entry” message could be triggered by several different conditions:
- You may not have met a prerequisite or corequisite requirement.
- The course may meet at a location different from those for which you are authorized to register.
- You may have tried to add a course that conflicts with another, already registered, course.
When/if you do run into an “Unauthorized Course Entry” message, the message will display just above your registered courses and look like the image below.

The message will indicate why you were not able to add the course and offer a suggestion on how to resolve the error. If you believe that the “Unauthorized Course Entry” message is itself an error, please consult with your academic advisor and/or the Registrar’s Office.
Advisor Approval
Once you are registered, your academic advisor will need to approve your schedule before it is considered ‘complete’. Your advisor may contact you with questions or concerns before approving your schedule, especially if your registered courses are different from the ones your advisor recommended. Please remember that you, as the student, are primarily responsible for course selection and making progress toward completion of your degree program. Departing from the course schedule worked out in partnership with your advisor may delay your graduation.
Dropping Registered Courses
In the event you need to drop one or more of your registered courses, you can do so from within the “Add/Drop” area of the “Course Catalog” portlet. As with each of the registration methods discussed above, click on the “Add/Drop Courses” button under “Add/Drop” to access the drop function.

To view your registered courses for a specific Term, change the Term pull-down menu to equal the one you wish to view.


Your registered courses will display alphanumerically by catalog number and section. If you are still allowed to drop a course without assistance from your academic advisor, a “Drop” check box will appear just to the left of each course. To drop a course, click the check box next to the course you wish to drop and then the “Drop Course(s)” button just below your list of courses.
Students are strongly advised to consult with their academic advisor and Financial Aid before dropping one or more courses.